![]()
2. Using ENVI on your own computer
2.1. Introduction
In these notes, we outline how you can do the image processing coursework for GEOG0027 using remote access UCL computing resources in a browser on any computer Desktop@UCL Anywhere.
2.2. Desktop@UCL
First, make sure you have Desktop@UCL Anywhere setup and the relevant software installed. Just follow the instructions on Desktop@UCL Anywhere. If this has worked, you should see the following window in your browser:

Click on the Desktop icon to launch Desktop. This will give you a windows session, running in your browser, connected to your UCL account.
NOTICE ENVI is not currently installed on Desktop anywhere … Im getting that fixed … but for the moment use one of the other options
2.3. Stand-alone installation of ENVI
EVERY time you want to use this program you must be connected to the UCL domain (see below.
If you are using your own computer you will need to install the ENVI software and license from the UCL software database.

2.3.1. Downloading and Installing ENVI
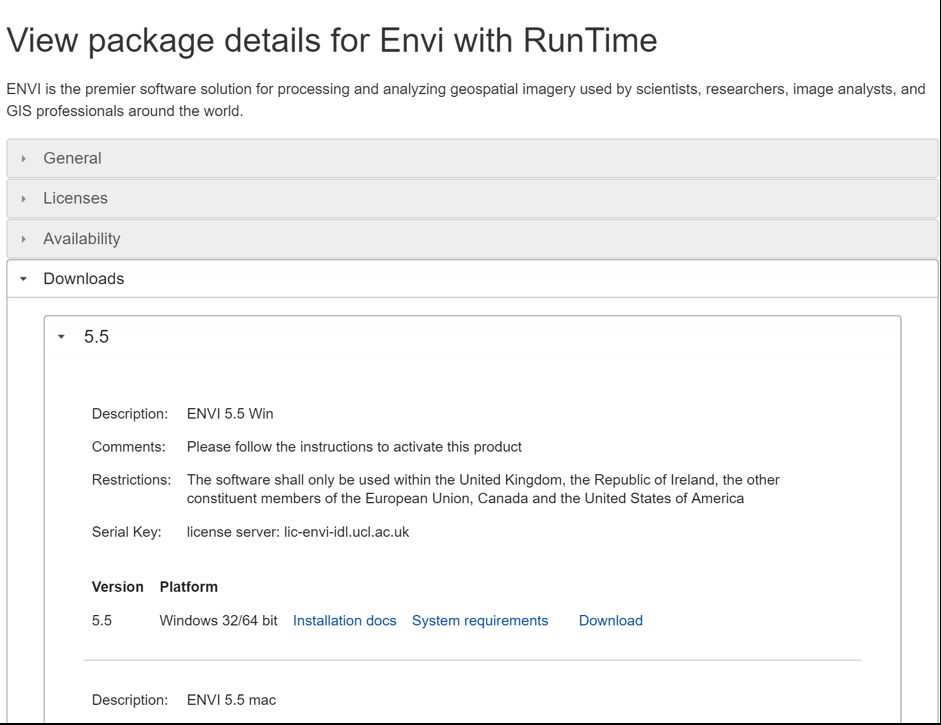
Download ENVI from http://swdb.ucl.ac.uk/package/view/id/142?filter=envi, getting the appropriate version for your computer (Mac, Windows or Linux).
Follow the instructions on the screen to install the software.
Further instructions on how to install ENVI can be found here:
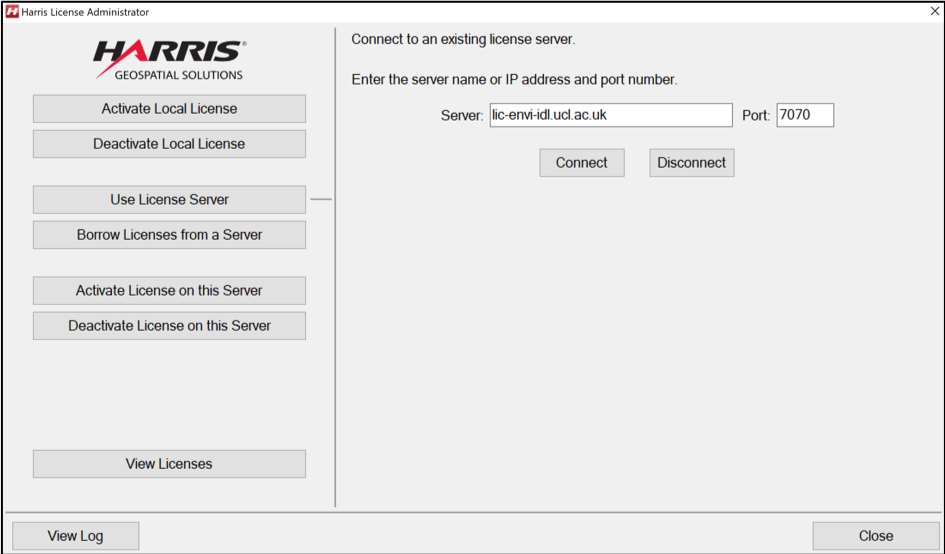
Once the installation has been completed you will be prompted to start the License Administrator select YES to begin the licensing process Select ‘User License Server’ and input lic-envi-idl.ucl.ac.uk as the server name and 7070 as the port number.
Click Connect and then close.
2.4. Set up a UCL VPN connection
If you are outside the university you will need to setup a Virtual Private Network (VPN) connection. This involves downloading software from ISD.
EVERY time you want to use this program you must be connected to the UCL domain.
2.4.1. For Windows:
- To setup a VPN connection please refer to https://www.ucl.ac.uk/isd/how-to/connecting-to-ucl-vpn-microsoft-windows

This involves downloading, installing and running
Ciscoanyconnectsoftware.Note that your machine needs to be running an anti-virus product. Further information on obtaining these products can be found at:
Once installed, connect the VPN to vpn.ucl.ac.uk and follow the instructions below.
EVERY time you want to use ENVI you must be connected to the UCL domain.
2.4.2. For Mac:
VPN
To setup a VPN connection please refer to https://www.ucl.ac.uk/isd/how-to/connecting-to-ucl-vpn-mac-os-x
This involves downloading, installing and running
Ciscoanyconnectsoftware.Note that your machine needs to be running an anti-virus product. Further information on obtaining these products can be found at:
Additional software
Note that, if you are using a Mac, you will need to install XQuartz as well (unless you already have it installed) to be able to use ENVI.
Once installed, connect the VPN to vpn.ucl.ac.uk and follow the instructions below.
EVERY time you want to use ENVI you must be connected to the UCL domain.
2.5. Using ENVI for GEOG0027
2.5.1. For Windows
2.5.1.1. Downloading the required files
- Create a folder on your device (e.g. on the
Desktop) calledGEOG0027. Within this, create a new folder calledgee(standing forGoogle Earth Engine).
This is where you are going to do your work. You might, for instance, do this on your Desktop.
Note that the path of your working directory (that we will need later) will relate to how you set this up, so make a note of it now.
For example:
C:\Users\YOURUSERNAME\Desktop\GEOG0027\gee
Go to the web page http://www2.geog.ucl.ac.uk/~plewis/GEOG0027/ and download the files:
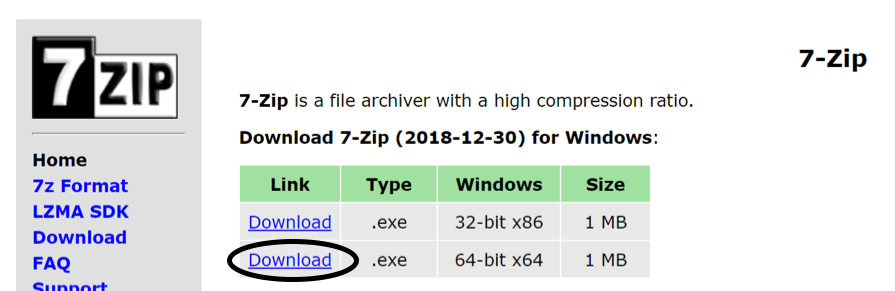
You may need some additional software to ‘unzip’ files. Some free software that works and UCL recommend is 7zip. Go to their website and install it (you will probably want the ‘64-bit’ version, unless you have a very old computer).
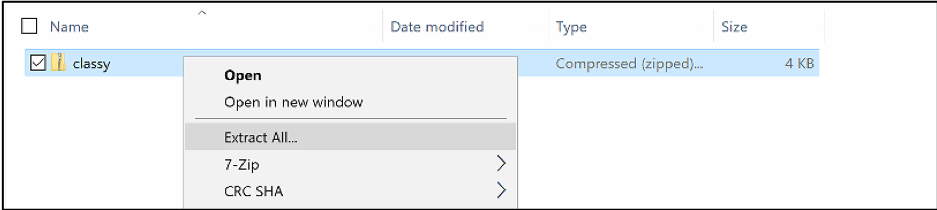
- When the data files (
classy.zipandgee.zip) have downloaded (thegee.zipfile will take a few minutes), you should just be able to click on them to run your software that will uncompress the files. You will want to extract them into yourGEOG0027\geefolder:
 ]
]
You should now be able to navigate to your GEOG0027\gee folder and see the downloaded files:
1986 1987 1988 1989 1990 1991 1992 1993 1994 1995
1996 1997 1998 1999 2000 2001 2002 2003 2004 2005
2006 2007 2008 2009 2010 2011 2012 2013 2014 2015
2016 2017 2018 2019
classy.pro
classy_lut1.dat classy_lut3.dat classy_lut4.dat
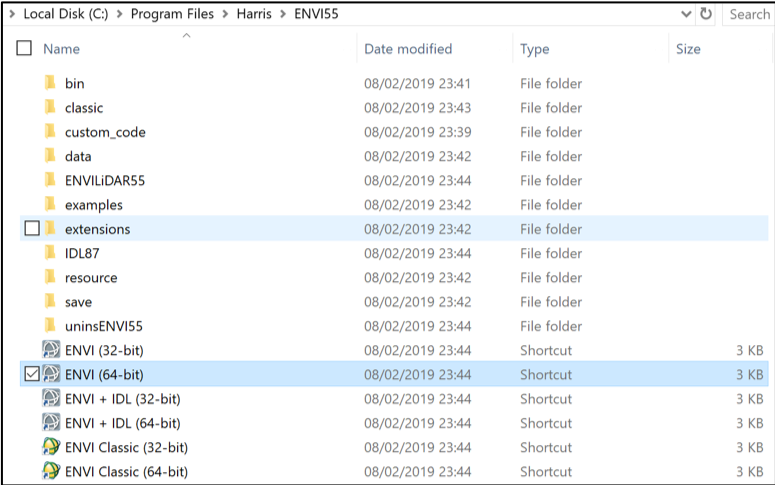
Once you have successfully installed ENVI (above), navigate to C:\Program Files\HARRIS\ENVI and open ENVI + IDL (64 bit):
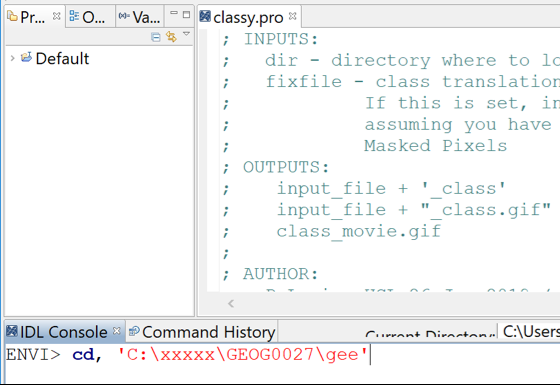
In the console that appears, type the following (adapted to where you have put your own data):
cd, ‘C:\Users\YOURUSERNAME\Desktop\GEOG0027\gee’
- The comma
,and quotes'are important! - Don’t put
YOURUSERNAME… put your username.
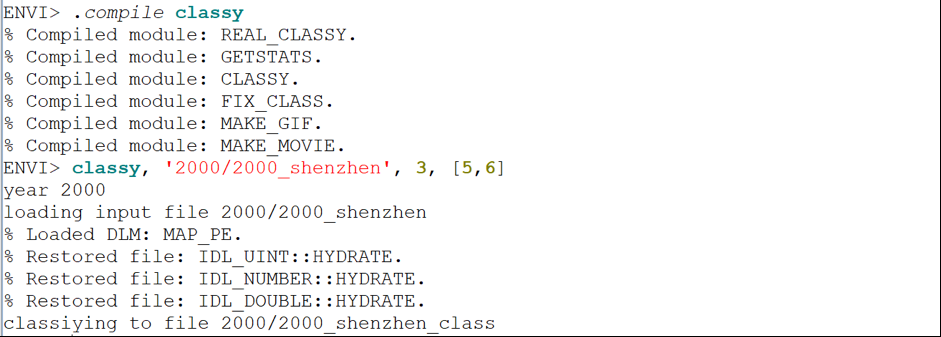
You will now be able to carry out the tasks we have been doing in the practical’s for example by loading the data into ENVI through this console which can then be opened in ENVI:
2.5.2. For Linux (Unix) or Mac
#### Command line and some unix commands
When, in the notes, we say ‘type at the command line’, we mean that youy should type the command in what you might call a Terminal or shelltool. On a Mac, find this under /Applications/Utilities/Terminal.app in Finder. On linux, it should be obvious (!).
The shell will show a prompt, e.g.:
%bash
To ‘type a command’, type at the prompt, then hit <return> to run the command.
% bash
It is helpful to know a few unix commands. The ones we will use are:
echo       :  print out a shell or environment variable
mkdir -p   :  create a directory (the -p option means not
              to complain if it already exists)
cd         :  change directory, i.e. move to somewhere on the
              file system.
pwd        :  print working directory
              (i.e. where am I in the file system?)
ls -lh     :  provide a listing of files. The -l option
              provides a 'long' listing. The -h option
              gives the file size in 'human readable' format
We need to make sure we are clear about where we will be working.
Let’s assume this is ${HOME}/DATA/GEOG0027/gee.
Try the following commands (don’t type the %%bash part):
[7]:
%%bash

# print the value of ${HOME} (our home on the system)
echo "print a shell/environment variable value:"
echo ${HOME}
# the echo here is to print a blank line
# to space the text out. Not something you'd
# normally do!
echo

# create the data directory
echo "make a directory for our data"
mkdir -p ${HOME}/DATA/GEOG0027/gee
echo

# change to that directory
echo "Change directory to the data area"
cd ${HOME}/DATA/GEOG0027/gee
echo

# print where we are
echo "we are: (using pwd)"
pwd
echo

# see what files we have (this might be nothing at first!)
echo "get a long file listing"
ls -lh
echo

# sometimes, we will just use ls,
# a simple listing of what files there are:
echo "get a short file listing"
ls
print a shell/environment variable value:
/Users/plewis

make a directory for our data

Change directory to the data area

we are: (using pwd)
/Users/plewis/DATA/GEOG0027/gee

get a long file listing
total 6031232
drwx------  21 plewis  staff   672B  8 Feb 13:28 1986
drwx------  22 plewis  staff   704B  8 Feb 13:28 1987
drwx------  22 plewis  staff   704B  8 Feb 13:28 1988
drwx------  22 plewis  staff   704B  8 Feb 13:28 1989
drwx------  22 plewis  staff   704B  8 Feb 13:28 1990
drwx------  22 plewis  staff   704B  8 Feb 13:28 1991
drwx------  22 plewis  staff   704B  8 Feb 13:28 1992
drwx------  22 plewis  staff   704B  8 Feb 13:28 1993
drwx------  22 plewis  staff   704B  8 Feb 13:28 1994
drwx------  22 plewis  staff   704B  8 Feb 13:28 1995
drwx------  22 plewis  staff   704B  8 Feb 13:28 1996
drwx------  22 plewis  staff   704B  8 Feb 13:28 1997
drwx------  22 plewis  staff   704B  8 Feb 13:28 1998
drwx------  22 plewis  staff   704B  8 Feb 13:28 1999
drwx------  22 plewis  staff   704B  8 Feb 13:28 2000
drwx------  22 plewis  staff   704B  8 Feb 13:28 2001
drwx------  22 plewis  staff   704B  8 Feb 13:29 2002
drwx------  22 plewis  staff   704B  8 Feb 13:29 2003
drwx------  22 plewis  staff   704B  8 Feb 13:29 2004
drwx------  22 plewis  staff   704B  8 Feb 13:29 2005
drwx------  22 plewis  staff   704B  8 Feb 13:29 2006
drwx------  22 plewis  staff   704B  8 Feb 13:29 2007
drwx------  22 plewis  staff   704B  8 Feb 13:29 2008
drwx------  22 plewis  staff   704B  8 Feb 13:29 2009
drwx------  22 plewis  staff   704B  8 Feb 13:29 2010
drwx------  22 plewis  staff   704B  8 Feb 13:29 2011
drwx------  22 plewis  staff   704B  8 Feb 13:29 2012
drwx------  22 plewis  staff   704B  8 Feb 13:29 2013
drwx------  22 plewis  staff   704B  8 Feb 13:29 2014
drwx------  22 plewis  staff   704B  8 Feb 13:29 2015
drwx------  22 plewis  staff   704B  8 Feb 13:29 2016
drwx------  22 plewis  staff   704B  8 Feb 13:29 2017
drwx------  22 plewis  staff   704B  8 Feb 13:29 2018
drwx------  22 plewis  staff   704B  8 Feb 13:29 2019
-rw-r--r--   1 plewis  staff   6.4K  7 Feb 10:21 classy.pro
-rw-r--r--   1 plewis  staff   2.6K  8 Feb 13:21 classy.tar.Z
-rw-r--r--   1 plewis  staff   212B  7 Feb 02:09 classy_lut1.dat
-rw-r--r--   1 plewis  staff   119B  7 Feb 02:09 classy_lut3.dat
-rw-r--r--   1 plewis  staff   135B  7 Feb 02:09 classy_lut4.dat
-rw-r--r--   1 plewis  staff   2.9G  8 Feb 13:26 gee.tar.Z

get a short file listing
1986
1987
1988
1989
1990
1991
1992
1993
1994
1995
1996
1997
1998
1999
2000
2001
2002
2003
2004
2005
2006
2007
2008
2009
2010
2011
2012
2013
2014
2015
2016
2017
2018
2019
classy.pro
classy.tar.Z
classy_lut1.dat
classy_lut3.dat
classy_lut4.dat
gee.tar.Z
2.5.2.1. Pull some files from the internet
We will now pull some data and code files we need for this work. They are all available through the link http://www2.geog.ucl.ac.uk/~plewis/GEOG0027, but we can directly pull the files from the command line.
To do this, we need two more unix commands:
curl       :  get a file from a URL
tar        :  File comnpression and uncompression
Pulling the files will take a little time, but you only need to do this once!
[26]:
%%bash

# just to be safe, make sure we have the data directory!
mkdir -p ${HOME}/DATA/GEOG0027/gee
# and go there
cd ${HOME}/DATA/GEOG0027/gee

# pull the code file:
curl http://www2.geog.ucl.ac.uk/~plewis/GEOG0027/classy.tar.Z -o classy.tar.Z
# pull the data file: this will take a few minutes!!
curl http://www2.geog.ucl.ac.uk/~plewis/GEOG0027/gee.tar.Z -o gee.tar.Z
  % Total    % Received % Xferd  Average Speed   Time    Time     Time  Current
                                 Dload  Upload   Total   Spent    Left  Speed
100  2622  100  2622    0     0   102k      0 --:--:-- --:--:-- --:--:--  102k
  % Total    % Received % Xferd  Average Speed   Time    Time     Time  Current
                                 Dload  Upload   Total   Spent    Left  Speed
100 2944M  100 2944M    0     0  10.4M      0  0:04:41  0:04:41 --:--:-- 11.2M
This should have pulled the files we need to the local file system.
We can check this, and then uncompress the files:
[31]:
%%bash

# just to be safe, make sure we have the data directory!
mkdir -p ${HOME}/DATA/GEOG0027/gee
# and go there
cd ${HOME}/DATA/GEOG0027/gee

# get a long listing of the pulled files
# to see they are the right size
ls -lh classy.tar.Z gee.tar.Z

# uncompress them
tar xvzf classy.tar.Z
tar xzf gee.tar.Z
-rw-r--r--  1 plewis  staff   2.6K  8 Feb 13:21 classy.tar.Z
-rw-r--r--  1 plewis  staff   2.9G  8 Feb 13:26 gee.tar.Z
x classy_lut1.dat
x classy_lut3.dat
x classy_lut4.dat
x classy.pro
Let’s just do a final check that the files are there:
[1]:
%%bash
cd ${HOME}/DATA/GEOG0027/gee

# now ls
ls
1986
1987
1988
1989
1990
1991
1992
1993
1994
1995
1996
1997
1998
1999
2000
2001
2002
2003
2004
2005
2006
2007
2008
2009
2010
2011
2012
2013
2014
2015
2016
2017
2018
2019
classy.pro
classy.tar.Z
classy_lut1.dat
classy_lut3.dat
classy_lut4.dat
gee.tar.Z
2.5.2.2. Using ENVI
Now we have the files and setup we need, we can simply run envi. To do this, type envi at the command line prompt:
[1]:
%%bash
/Applications/harris/envi/bin/envi
IDL 8.7.0 (darwin x86_64 m64).
(c) 2018, Harris Geospatial Solutions, Inc.

Licensed for use by: University College London-CHEST
License: 405435-CHEST:****-****-****-B2C6
License expires  5-Mar-2019.
A new version is available: IDL 8.7.1
https://harrisgeospatial.flexnetoperations.com

% Restored file: ENVI.
% Loaded DLM: PNG.
% Loaded DLM: HPGRAPHICS.
% Loaded DLM: XML.
2.6. Summary
In this section, we have learned how to install the data files and software needed to do the coursework on your own computer, for your convenience. You can use all of the (linux) machines in the Geography lab, as we do in class, without the need for your own computer or any of this installation. Ideally, this should all be available on Desktop@UCL but that is not currently the case.
- Instructions summary / checklist: