![]()
3. Install software and files for modelling
3.1. Setup options
3.1.1. Using R or Rstudio
There are several ways you can develop and run the modelling code we will be using.
We will be using the R software that you should be familiar with for the first year. If you need to refresh you memory with what you did in GEOG0013, we provide the relevant files for you on moodle. Try to make sure you are familiar with loading csv files, basic graphing, and performing linear regression.
3.1.2. Which option should I choose?
It is probably easiest for you to use the RStudio environment for this work. First, this should be what you are familiar with. Second, it is convenient to use to develop codes and save the results as a report. Third, it is much easier to use with these notes.
On the UCL Geography computers, we don’t have Rstudio, only R. You should be able to use this, but it doesn’t give you the fancy interface.
The options for software environments for doing this part of the work are:
- Run
Ron the Geography UCL (Linux) computers - Run
Rstudiousing Windows on Desktop@UCL Anywhere - Run
Rstudio(orR) on your own computer - Run
Rstudioon binder - Run
R(via Python) on Jupyter
The advantage of using option 1. is that you don’t need to do anything other than come along and use the computers in the Geography Unix lab. Whilst there are ways you can access this remotely, it is perhaps not the easiest thing for you to do so, so if you intend working outside of the lab a lot, then consider another option. Also, you don’t have access to RStudio in this option.
Options 2-4 would probably be the best for you to consider.
Option 5 is very neat, and involves running the codes in a notebook (this is a notebook you are using now!). But it is more complex to explain how to do this. If you are particularly interested in this sort of computing, we will help individuals to go through this route on request.
Option 3 needs you to set up software. Options 2 and 3 need you to install data and code files.
Option 4 has everything set up for you, runs in any browser (so, even on your phone or tablet), on an external server, but you are at risk of losing your work if you let the session go idle for 10 minutes or more, or if your session lasts longer than 12 hours. You can of course save and reload your work, but you have to be more careful of this in option 4. Also, option 4 takes a few minutes to get started, as it has to run a remote server.
3.1.3. Installing R and Rstudio on your own computer
Option 3 involves setting up R and Rstudio on your own computer.
To install the packages you need for R and RStudio, follow the links below to download and install the software. Check it works by starting RStudio.
- Download and install R from https://cran.rstudio.com
- Download and install RStudio from https://www.rstudio.com
3.1.4. Installing data packages
3.1.4.1. Best way (recommended)
A preferable way to do this, is to access these notes directly from RStudio.
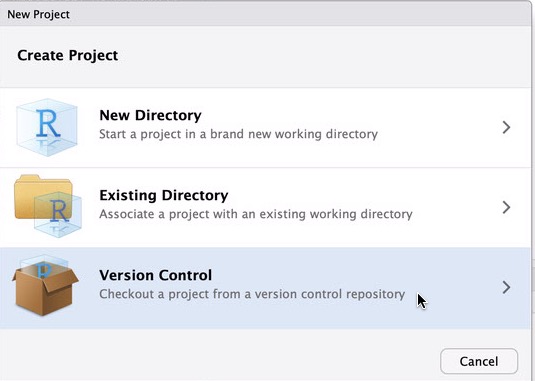
Once you have started RStudio on any computer, start a new project:

Then select Version control:
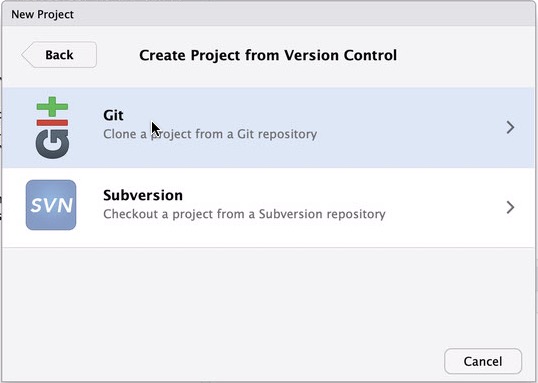
Then git:
Fill in the form, with:
Repository URL as https://github.com/profLewis/GEOG0027_Coursework.git
Project directory name as some suitable name you will remember
and
Create project as subdirectory of: somewhere suitable, e.g. Desktop/GEOG0013
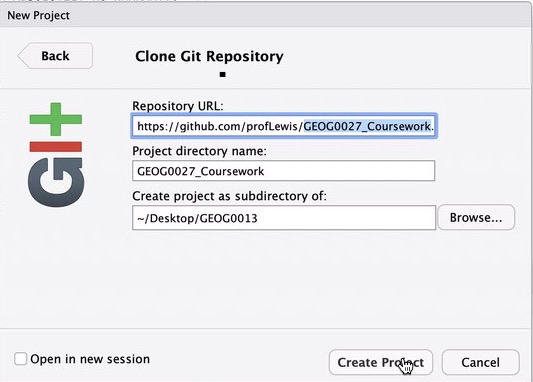
This will then download the GEOG0027_Coursework git repository. This has the advantage of containing all of the codes, files and notes.
After you have installed this, you should be able to navigate to the GEOG0027_Coursework/docs/files folder, and click on the icon for GEOG0027_Coursework.Rproj to start the RStudio session.

3.1.4.2. Minimal way (not recommended)
For options 2 and 3, the minimal data/code requirement is that you install a few data and software packages. This involves downloading the file UrbanModel.zip and unzipping and storing it in your workspace (e.g. in GEOG0027/gee).
3.1.5. Option 1
In a terminal (shelltool), change directory to where your data files are.
Start R by typing R at the command line prompt.
Follow the instructions in the Modelling section, typing R commands at the R prompt.
3.1.6. Option 2
Start Desktop@UCL Anywhere in a browser.
Start RStudio, and run RStudio as directed above.
3.1.7. Option 3
Install R and Rstudio.
Start RStudio on your computer, and run RStudio as directed above.
3.1.8. Option 4
Start RStudio by clicking the binder badge, and run RStudio as directed above: ![]()
Then:
- Upload any previous session files.

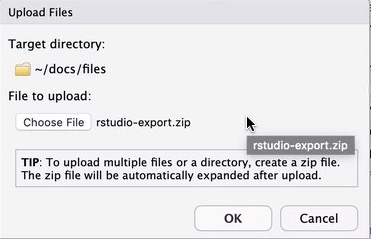
This will create a folder called (e.g.) rstudio-export.
We need to restore the files from here to the working directory.
To do this:
- in the
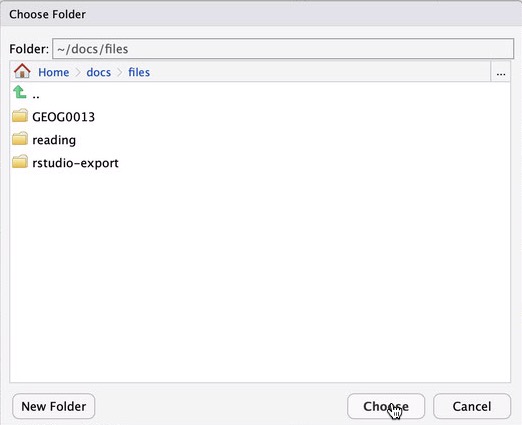
Filespanel, click on the folder you have just uploaded (rstudio-export) to ‘go into’ that folder. - Select all of the files you want to move (tick the check boxes):
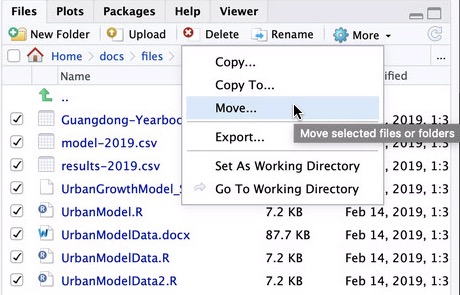
- and move the files to the normal working folder:
Note that this will over-write the files in that folder.
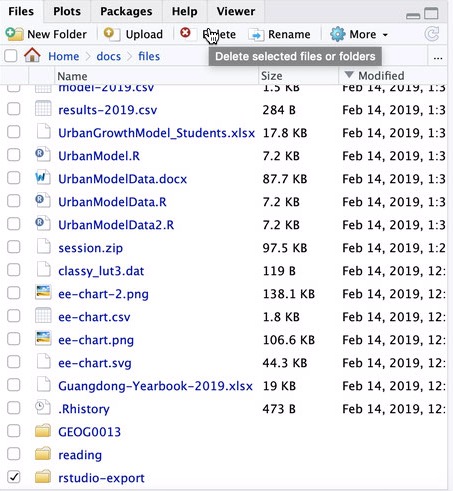
- finally, delete the (now empty)
rstudio-exportfolder
- Do your work in
RStudioas usual - Save and download your session files.
To do this:
- select the files you want to save (check boxes)
- Under the
Moremenu, selectExport ...

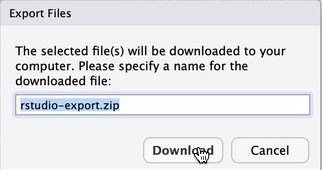
- and save the file (
rstudio-export.zip) to your local file system.
You can use this same approach to transfer files between any different RStudio sessions you are running on different computers.
3.1.9. Option 5
One way to use option 5 is to start this page in Binder: ![]()
3.2. Running Rstudio
3.2.1. Select the .Rproj file
There should be an file that ends .Rproj in your folder docs/files
If you click on this, then RStudio should load up, with information from any previous sessions.
Alternatively, start RStudio any other way.
3.2.2. Set working directory
In RStudio, check to see where your files panel (bottom right) is showig. If this isn’t your data area, navigate to where your data and code files are, and set this as the working directory.
You will need the following files, so check they exist in your data folder!
3.2.3. Required files
3.2.4. Load and run UrbanModelData.R
Select the file UrbanModelData.R so that it appears in the code window:

Then run the source file (this will run UrbanModelData.R)
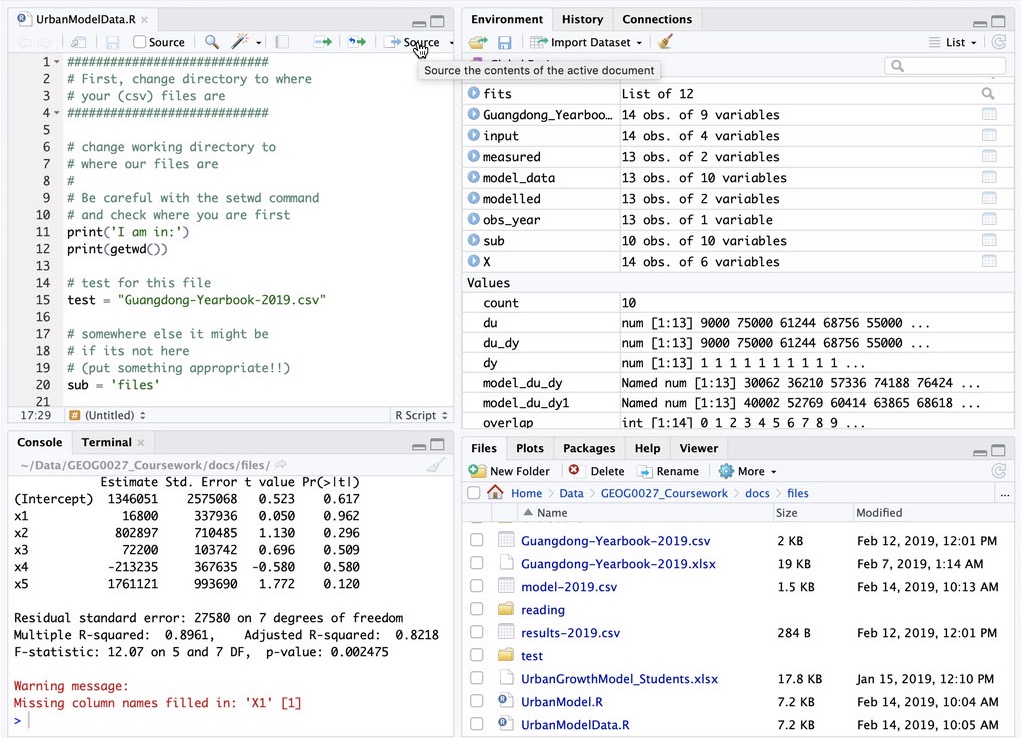
Now we’ve seen that it works, you can look through the code in a little more detail.
This code loads the datasets you need, runs a linear regression, and plots appropriate graphs. We will go through this in detail in the modelling section, but you should try to understand the basic layout and operation of the codes.
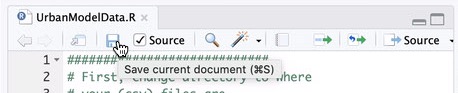
3.2.5. Save the R file regularly
When working, you will be able to save the R file after you have made any edits. Make sure you do so quite regularly. You may like to check the source on save tick box, which then re-runs your script when you save it (to see you haven’t broken it)
3.2.6. Binder care
If you are using the binder interface, then before you quit any session (and perhaps from time to time in a session), make sure you save any files you might need, and download them to the local computer (to store somewhere safe).
To do this:
- select the files you want to save (check boxes)
- Under the
Moremenu, selectExport ...
- and save the file (
rstudio-export.zip) to your local file system.
You can use this same approach to transfer files between any different RStudio sessions you are running on different computers.
If you quit RStudio, you should be asked whether you want to save the workspace. Do so, so then the next session (next time you run RStudio) you can start where you left off.
3.2.7. Write a report
Once you have done some work (in the modelling section) you will want to save the R file (above) but you may also want to generate a report on your script. One good way to do this is to save the report as a Word file (assuming you have MS Word installed on your computer).
To do this, click on the compile report button:

Change the report format to MS Word and compile the report.
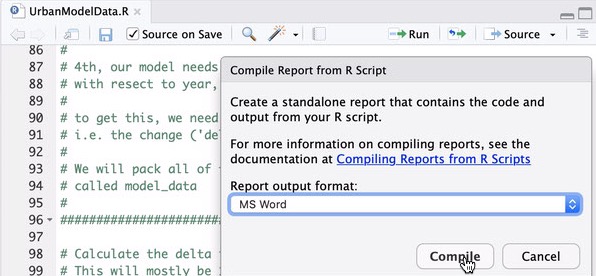
The file, a formatted version of your code and output such as graphs, will be saved into the local directory UrbanModelData.docx. You will find these useful when you come to write your reports. Dont however